Search FAQs
Video: Data Center Expert | Backing up to a Windows Share
Issue:
Process for creating a Windows share backup within StruxureWare Data Center Expert.
Product Line:
StruxureWare Data Center Expert (DCE)
- Basic Appliance (AP9465)
- Standard Appliance (AP9470)
- Enterprise Appliance (AP9475)
- Virtual Appliance (AP94VMACT)
Environment:
Data Center Expert (version 6.X to 7.X)
Cause:
DCE backups should be performed on a regular basis.
Resolution:
Creating a Windows Share
Performing a Backup within DCE
Troubleshooting

Microsoft released a security update to disable SMBv1 for Windows operating system. Data Center Expert 7.8.1 and below only support Windows shares that utilize SMBv1. You may need to make adjustments to your Windows share system to allow Data Center Expert to backup to it, or use NFS shares as an alternative. Data Center Expert 7.9.0 and above offers a new back end operating system and supports SMBv2 and above.
Microsoft Resources on SMB Security: https://docs.microsoft.com/en-US/windows-server/storage/file-server/troubleshoot/detect-enable-and-disable-smbv1-v2-v3

Creating a Windows Share
NOTE: NTLM and SMB versions may prevent a windows share from being mounted. If problems are experienced, please see the troubleshooting section at the bottom.
1) Create a folder on the Windows system that you would like to be the backup destination.
2) Right-click on the folder and select Properties.
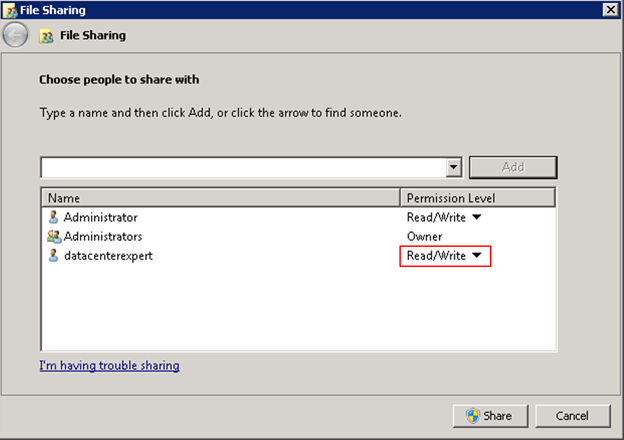
3) Select the Sharing tab and then Share. 4) Add the specific user that you would like DCE to use to connect for storing the backup.

5) Set the user's permission level to be Read/Write.

6) Select Share and then Done.
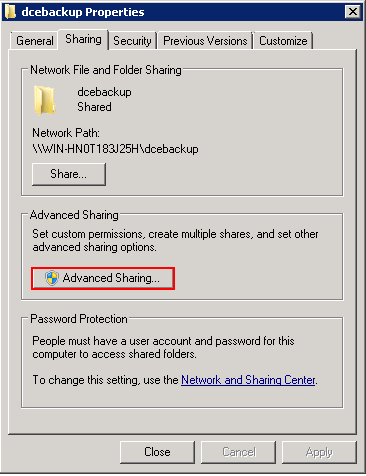
7) Select Advanced Sharing.

8) Ensure that the Share this folder checkbox is checked and then select Permissions.
9) Add the specific user that you would like DCE to use to connect to this share (same user as step 5).
10) Set the user for Full Control. Select Apply and OK.

11) Select Apply and OK.
NOTE: You will need the share name, IP address of the windows system the share is stored on, and the credentials for the user you granted full control.
Performing a Backup within DCE
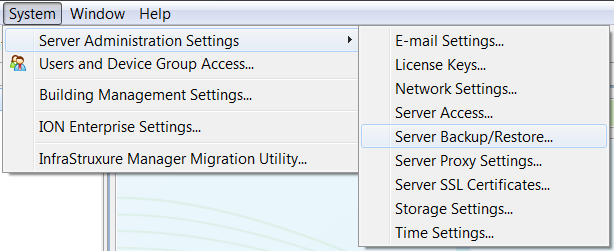
1) Open the DCE client, and go to: System menu > Server Administration Settings > Server Backup/Restore.

2) Select Add Backup.
3) Select Windows Share and Next.
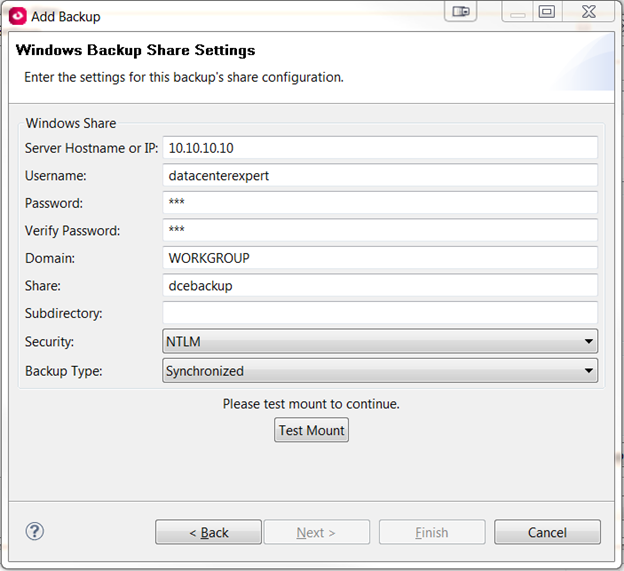
4) Fill in the required share information. 5) Select Test Mount. If successful, it will inform you that the share was mounted successfully. Select Next.
6) If desired, you can enable the backup to be performed at specific times on certain days of the week. Select Finish.
7) Select the backup in the list and then select Start Backup. You can continue to use the system during the backup process. When the backup finishes you will see the last backup finish date and last result of the backup. DO NOT CHANGE THE NAME OF THE BACKUP FILE.
Troubleshooting
NOTE: Please note that backups do not overwrite one another and a share may eventually get too full to accommodate more backups. You can not delete backups that exist on a share through StruxureWare. Please access the shared drive/folder directly to delete old backups or add space to the current allocation should more space be required.
NTLM version 2 Support
StruxureWare Data Center Expert versions before 7.3.1 do not support mounting to shares that require NTLMv2 authentication. In some situations, it may allow you to successfully “test mount”, but will not authenticate when attempting a backup or when using this share as a remote repository. It is recommended to use a share that allows for NTLMv1 authentication and to contact technical support to have your software support verified and receive upgrade links.
SMB Version 2 and Higher Support
Microsoft began disabling SMB version 1 in Windows Updates. This can cause Data Center Expert to be unable to back up to existing shares or mount new shares. Information on enabling SMBv1: https://support.microsoft.com/en-us/help/2696547/detect-enable-disable-smbv1-smbv2-smbv3-in-windows-and-windows-server
Data Center Expert 7.9.0 and above supports SMB version 2 and higher, and no longer supports SMBv1. Data Center Expert 7.8.1 and below only supports SMB version 1.
Process for creating a Windows share backup within StruxureWare Data Center Expert.
Product Line:
StruxureWare Data Center Expert (DCE)
- Basic Appliance (AP9465)
- Standard Appliance (AP9470)
- Enterprise Appliance (AP9475)
- Virtual Appliance (AP94VMACT)
Environment:
Data Center Expert (version 6.X to 7.X)
Cause:
DCE backups should be performed on a regular basis.
Resolution:
Creating a Windows Share
Performing a Backup within DCE
Troubleshooting
Microsoft released a security update to disable SMBv1 for Windows operating system. Data Center Expert 7.8.1 and below only support Windows shares that utilize SMBv1. You may need to make adjustments to your Windows share system to allow Data Center Expert to backup to it, or use NFS shares as an alternative. Data Center Expert 7.9.0 and above offers a new back end operating system and supports SMBv2 and above.
Microsoft Resources on SMB Security: https://docs.microsoft.com/en-US/windows-server/storage/file-server/troubleshoot/detect-enable-and-disable-smbv1-v2-v3
Creating a Windows Share
NOTE: NTLM and SMB versions may prevent a windows share from being mounted. If problems are experienced, please see the troubleshooting section at the bottom.
1) Create a folder on the Windows system that you would like to be the backup destination.
2) Right-click on the folder and select Properties.
3) Select the Sharing tab and then Share.
5) Set the user's permission level to be Read/Write.
6) Select Share and then Done.
7) Select Advanced Sharing.
8) Ensure that the Share this folder checkbox is checked and then select Permissions.
9) Add the specific user that you would like DCE to use to connect to this share (same user as step 5).
10) Set the user for Full Control. Select Apply and OK.
11) Select Apply and OK.
NOTE: You will need the share name, IP address of the windows system the share is stored on, and the credentials for the user you granted full control.
Performing a Backup within DCE
1) Open the DCE client, and go to: System menu > Server Administration Settings > Server Backup/Restore.
2) Select Add Backup.
3) Select Windows Share and Next.
4) Fill in the required share information.
- Server Hostname or IP: Enter the IP address of the system that contains the windows share. (Hostname can be used if DNS is configured in System > Server Administration Settings > Network Settings)
- Username: User that has read/write permission to the windows share (Steps 3 & 5)
- Password/Verify Password: Password of the user defined in the username field.
- Domain: If the computer is on a domain, enter the domain name or workgroup name (Control panel > System)
- Share: Name of the windows share defined in step 6.
- Subdirectory: If a subdirectory was created in the window share (not required)
- Security: On Data Center Expert version 7.3.1 and higher, the share security can be defined. Below v7.3.1 only NTMLv1 is allowed.
- Backup Type: Full, Synchronized, or Configuration
6) If desired, you can enable the backup to be performed at specific times on certain days of the week. Select Finish.
7) Select the backup in the list and then select Start Backup. You can continue to use the system during the backup process. When the backup finishes you will see the last backup finish date and last result of the backup. DO NOT CHANGE THE NAME OF THE BACKUP FILE.
Troubleshooting
NOTE: Please note that backups do not overwrite one another and a share may eventually get too full to accommodate more backups. You can not delete backups that exist on a share through StruxureWare. Please access the shared drive/folder directly to delete old backups or add space to the current allocation should more space be required.
NTLM version 2 Support
StruxureWare Data Center Expert versions before 7.3.1 do not support mounting to shares that require NTLMv2 authentication. In some situations, it may allow you to successfully “test mount”, but will not authenticate when attempting a backup or when using this share as a remote repository. It is recommended to use a share that allows for NTLMv1 authentication and to contact technical support to have your software support verified and receive upgrade links.
SMB Version 2 and Higher Support
Microsoft began disabling SMB version 1 in Windows Updates. This can cause Data Center Expert to be unable to back up to existing shares or mount new shares. Information on enabling SMBv1: https://support.microsoft.com/en-us/help/2696547/detect-enable-disable-smbv1-smbv2-smbv3-in-windows-and-windows-server
Data Center Expert 7.9.0 and above supports SMB version 2 and higher, and no longer supports SMBv1. Data Center Expert 7.8.1 and below only supports SMB version 1.

