Issue:
NetBotz TFTP upgrade procedure.
Product Line:
NetBotz version 3
Environment:
NetBotz model: 355, 455, 450, 550, 570.
Cause:
Optional NetBotz firmware upgrade/recovery instructions. This option may also be a suggested procedure for restoring a NetBotz appliance to default due to unknown configuration issues or other unknown behavior on a NetBotz appliance.
Resolution:
Example PuTTy Configuration:
1) Under Session, change the connection type to serial. 
2) Edit the serial connection parameters under: Connection > Serial 
Example HyperTerminal Configuration:

8) When opening the connection, you should be at a login prompt.
Note: Please read ALL of step 9 before continuing.
9) Unplug the power from the NetBotz Appliance while keeping the serial connection open. Wait 5 seconds and plug it back in. When it is turned back on, you will need to have the serial session active. It will be counting down to stop the auto-boot, press <enter> to stop the auto-boot sequence. If you do not see the countdown, repeat this step.
10) You should now be at a NetBotz> prompt. Enter the following commands to direct the appliance where to retrieve the new code from:
11) Stop the auto-boot again before the countdown expires.
12) If the appliance is using DHCP, please proceed to step 12f. If the appliance is not using DHCP, set the IP address using the following steps:
13) Stop the auto-boot again before the countdown expires.
14) Issue the following command: postupg <enter> (This starts the firmware upgrade process) 

Note: Read through step 16, before performing step 15.
15) After the upgrade completes, issue the following command: reset <enter> (reboots the NetBotz Appliance)
16) Stop the auto-boot again before the countdown expires.
17) Issue the following command: rootupg <enter> This process will take approximately 7-8 minutes to complete. After completing, the system will automatically reboot.
Note: There is an additional option of rootupgkeep instead of rootupg, which will keep the settings on the appliance.
18) Let the appliance fully boot to the login prompt. Log into the appliance using a username/password of root/apc to set the new root password and network settings on the appliance.
Note: Due to California State legislation (SB-327), the appliance has HTTP/HTTPS access turned off by default. Details can be found in knowledge base HTTP and HTTPS turned off by default on NetBotz 4.7 .
You should now be able to manage the NetBotz Appliance using the Advanced View application.
NetBotz TFTP upgrade procedure.
Product Line:
NetBotz version 3
Environment:
NetBotz model: 355, 455, 450, 550, 570.
Cause:
Optional NetBotz firmware upgrade/recovery instructions. This option may also be a suggested procedure for restoring a NetBotz appliance to default due to unknown configuration issues or other unknown behavior on a NetBotz appliance.
Resolution:
Note: These steps must be run from a PC on the same network segment as the NetBotz Appliance.
Note: The only cables/sensors that can remain plugged into the NetBotz Appliance during this procedure are the USB console cable and the network cable.
1) Download the most recent firmware from apc.com for your NetBotz Appliance (355, 455, 450, 550, or 570).
2) Extract the zip file on your computer.
3) Due to antivirus programs setting the TFTPd32.exe file as a virus, it is no longer provided within the firmware download. You may use any TFTP program.
4) Set the base directory of your TFTP server to be the extracted firmware files tftp directory (/releases_netbotzv3/4.X.X/tftp/)
Note: Ensure that there are no firewalls or other network security that would block TFTP traffic between the NetBotz Appliance and the computer running the TFTP server.
5) Connect a USB cable from your computer to the console port on the Appliance.
6) To find the correct communication (COM) port to use within the next step, you will need to open the Device Manager within the control panel. Within the Ports section will be a USB Serial port with a COM# listed at the end in parenthesis. If the USB Serial Adapter is not showing, refer to knowledge base NetBotz v3 | Serial connection issues .
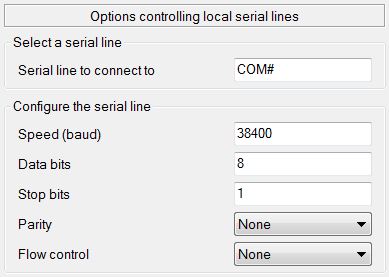
7) Open a terminal emulator such as Windows HyperTerminal or PuTTy. Select serial communication and use the following settings:
- Bits/second: 38,400
- Data Bits: 8
- Parity: None
- Flow Control: None
- Data Bits: 8
- Parity: None
- Flow Control: None
- Stop Bits: 1
Example PuTTy Configuration:
1) Under Session, change the connection type to serial.
2) Edit the serial connection parameters under: Connection > Serial
Example HyperTerminal Configuration:
1) Type a name for the connection and on the next screen select the appropriate COM port that was discovered earlier
8) When opening the connection, you should be at a login prompt.
Note: Please read ALL of step 9 before continuing.
9) Unplug the power from the NetBotz Appliance while keeping the serial connection open. Wait 5 seconds and plug it back in. When it is turned back on, you will need to have the serial session active. It will be counting down to stop the auto-boot, press <enter> to stop the auto-boot sequence. If you do not see the countdown, repeat this step.
10) You should now be at a NetBotz> prompt. Enter the following commands to direct the appliance where to retrieve the new code from:
a) setenv serverip aaa.bbb.ccc.ddd <enter> (aaa.bbb.ccc.ddd is the IP address of the PC that has the TFTP server installed and running)
b) saveenv <enter> (saving the server settings)
c) printenv <enter> (print the settings to the screen for verification)
Note: Please read step 11 before performing Step 10d.
d) reset <enter>
b) saveenv <enter> (saving the server settings)
c) printenv <enter> (print the settings to the screen for verification)
Note: Please read step 11 before performing Step 10d.
d) reset <enter>
11) Stop the auto-boot again before the countdown expires.
12) If the appliance is using DHCP, please proceed to step 12f. If the appliance is not using DHCP, set the IP address using the following steps:
a) setenv ipaddr aaa.bbb.ccc.ddd <enter> (IP address for the NetBotz Appliance)
b) setenv gatewayip aaa.bbb.ccc.ddd <enter> (Gateway IP address for the NetBotz Appliance)
c) setenv netmask aaa.bbb.ccc.ddd <enter> (Subnet mask for the NetBotz Appliance)
d) saveenv <enter> (saving the network settings)
e) printenv <enter> (print the network settings to the screen for verification)
Note: Read step 13 before performing step 12f.
f) reset <enter> (reboots the NetBotz Appliance)
f) reset <enter> (reboots the NetBotz Appliance)
13) Stop the auto-boot again before the countdown expires.
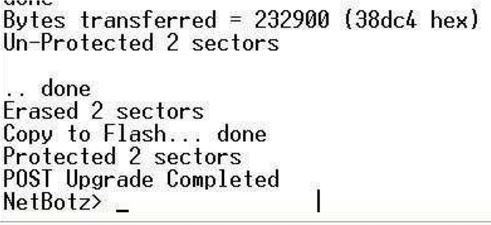
14) Issue the following command: postupg <enter> (This starts the firmware upgrade process)
a) If you see this, it means the network is not setup correctly and the steps need to be performed again (starting with step 9)
b) If it is successful, it will look like the following:
Note: Read through step 16, before performing step 15.
15) After the upgrade completes, issue the following command: reset <enter> (reboots the NetBotz Appliance)
16) Stop the auto-boot again before the countdown expires.
17) Issue the following command: rootupg <enter> This process will take approximately 7-8 minutes to complete. After completing, the system will automatically reboot.
Note: There is an additional option of rootupgkeep instead of rootupg, which will keep the settings on the appliance.
18) Let the appliance fully boot to the login prompt. Log into the appliance using a username/password of root/apc to set the new root password and network settings on the appliance.
Note: Due to California State legislation (SB-327), the appliance has HTTP/HTTPS access turned off by default. Details can be found in knowledge base HTTP and HTTPS turned off by default on NetBotz 4.7 .
You should now be able to manage the NetBotz Appliance using the Advanced View application.
Publié pour:APC Canada (French)


