Issue
General information regarding the Network Port Sharing (NPS) Capability of AP8XXX Rack PDU models
Product Line
General information
Resolution
Refer to the detailed information sections below.
About the Network Port Sharing Feature
You can use the Network Port Sharing feature to view the status of and configure and manage up to four Rack PDUs using only one network connection. This is made possible by connecting the Rack PDUs via the "In" and "Out" ports on the Rack PDU front panel.
Note: All Rack PDUs in the group must be using the same Rack PDU firmware revision, 5.1.6 or later (excluding v6.0.5 EnergyWise), in order to support the Network Port Sharing Feature. v6.1.0 and higher is also available which supports this functionality while adding the functionality of v6.X.X AOS.
Display ID
The display ID is a number, 1 to 4, used to uniquely identify the Rack PDUs in a group. After two or more Rack PDUs are connected to one another in a group, they can be identified on the various interfaces by the use of this "Display ID". This Display ID is viewable on the LCD by selecting the Display Settings > Display ID > Show option on the LCD keypad.
Installation Instructions
Connect up to four Rack PDUs. Insert an RJ45 terminator (included) in the unused IN/OUT ports on each end of the chain.
 Note: Failure to use APC provided terminators (part number 0W4161A or lower profile version 0W05545A) may cause a loss of communication on the Rack PDUs. This is not supported nor will it likely work properly.
 Note: To reduce the possibility of communication issues, the maximum total length of cabling connecting Rack PDUs in a group should not exceed 10 meters.
All Rack PDUs in a Network Port Sharing group should reside in the same rack enclosure. Connect the "Network" port of one of the grouped Rack PDUs to a network hub or switch. This unit will be the "Host" for the Rack PDU group. A Host is defined as a Rack PDU that is connected to the network and is part of a Rack PDU group. Set up network functionality for this Host Rack PDU as specified in the Establish Network Settings section. The Host will automatically discover any "Guest" PDUs connected via In/Out ports. The Rack PDU group is now available via the Host's IP address.
Follow the instructions below before powering up any of the Rack PDUs in the group. If it is desired to have a specific assignment of Display IDs, this can be achieved by powering up the units for the first time in the desired order, 1 to 4. For example, before powering up any of the Rack PDUs connected in a group, determine the Display ID order that you would like. Then, first power up the unit that you would like to have Display ID 1. After that unit has initialized and the LCD has started displaying its screens, power on the unit that you would like to have Display ID 2. Continue in the same way for units 3 and 4, if applicable for your setup.
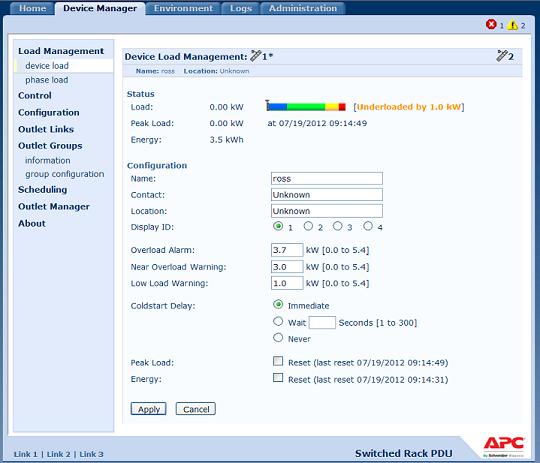
Note: The Display ID can be configured from the the web interface via the "Device Manager > Load Management > device load > Display ID" field.
Network Port Sharing and CLI Commands
The Command Line Interface allows commands to be sent to guest Rack PDUs. The user may specify the Display ID of the Rack PDU to be commanded, followed by a colon, before the first argument (or as the first argument, if the command does not normally have arguments). Providing a Display ID is optional, omitting it will simply command the local Rack PDU.
Syntax: <command> <id>:<arg1> <arg2>
This will send <command> to the Rack PDU with the Display ID <id>. <id> is delimited from <arg1> with a colon character; do not include any spaces between <id>:<arg1>, as spaces are used to delimit arguments.
Example: To view the power for phase 2 on guest Rack PDU 3, type:
apc> phReading 3:2 power
E000: Success
2: 40 W
Network Port Sharing and the Web Interface
Group Control using Network Port Sharing
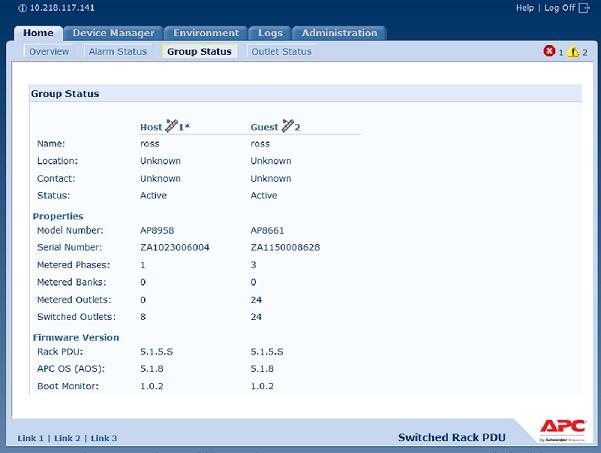
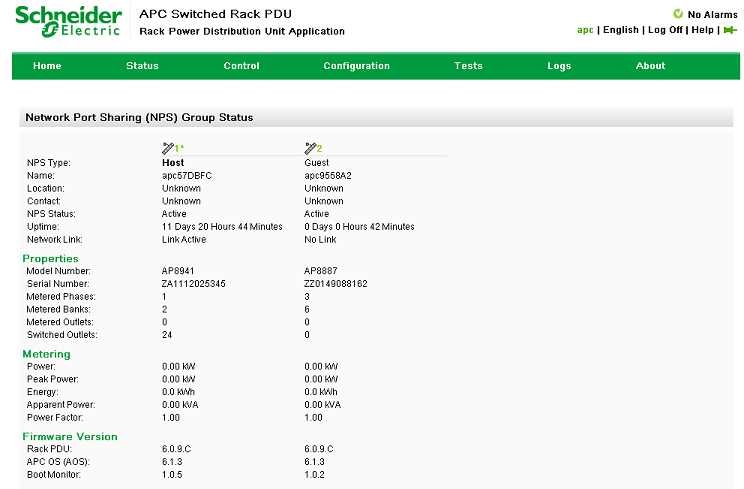
The web interface of the Rack PDU will have additional capabilities if the Rack PDU is part of a group. These capabilities are only displayed if the Rack PDU is part of a group. This includes a "Group Status" page, and the ability to select which Rack PDU to view data from. The Group Status page lists basic information for the Host Rack PDU and any connected guests. Guests are denoted using a Rack PDU icon and the Display ID. Information on the Group Status page includes name, location, contact, basic model properties, firmware revision information, and group communication status of each Rack PDU. In addition, the Group Status page allows the user to remove any Rack PDUs that have been removed from the group and are in a lost communication state.
v5.1.6 rpdu2g interface (Home->Group Status)

v6.1.0 and higher interface (Status->RPDU->Group)

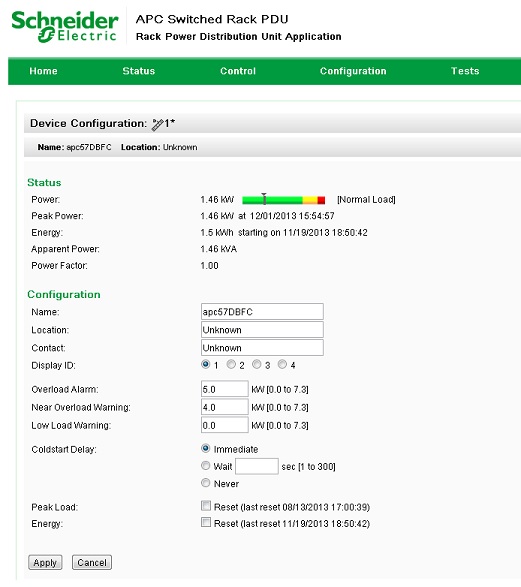
Most of the web pages under the navigation menus in the web allow you to switch between Rack PDUs for viewing status and configuration/control. This switching is accomplished by selecting the Rack PDU Display ID of the unit you would like to view. This is located at the top right of each table that supports multiple Rack PDUs. The Host Rack PDU that you are logged into is always denoted with an asterisk (*) following the Display ID.
v5.1.6 web interface

v6.1.0 and higher web interface

Note: The Reset/Reboot web page has many additional reset/reboot options for Rack PDU groups. These include individual Rack PDU reset to defaults, individual Rack PDU rebooting, and clearing of guest PDU lost communication alarms by removing the guests from the group.
Network Port Sharing and Outlet Groups/Outlet Users
To create an outlet group, you must enable the desired group method. Choices are Disabled, Local Only, Enabled via Network, and Enabled via In/Out Ports (Network Port Sharing).
All of the Rack PDUs must use firmware that has the same version number for both the APC Operating System (AOS) module and the application module.
Outlet Users
Outlet users can be assigned outlets on any Rack PDU in a group with switched outlets. The outlet users will be stored on the Host PDU. In the web interface, you can view outlets assigned to a particular PDU by clicking on its Display ID in the window. Outlet users can be configured on the Device Manager > Outlet Manager web page.
Network Port Sharing Event/Data Logs and Traps
Rack PDU events from guest PDUs are sent to the host PDU for inclusion into its log. The log entry will include the Display ID of the unit that the event occurred on. These events are then handled the same as local events from the host PDU. Therefore alarms, SNMP traps, e-mails, Syslog, etc will support Rack PDU events and alarms from all Rack PDUs in a group.
Note: System level events will only be logged for the host PDU. System events from guest PDUs will not be logged on the host PDU.
Example event log: Rack PDU 4: Outlet #2 off.
Network Port Sharing and the Data Log
The host Rack PDU will poll data from guest PDUs so that data from all PDUs in a group are available. To view data from a different Rack PDU in a group, select the desired Rack PDU from the "Filter Log" pull-down list. Similarly for data log graphing, you can select a different Rack PDU by clicking on the "Change Data Filter" button.
Network Port Sharing and RADIUS
See the Security Handbook for APC Network Management Cards for more information on using RADIUS.
For RADIUS users file with VSAs, outlets on guest Rack PDUs can be associated to RADIUS users by using the following method.
# give user access to outlets 1, 2, and 3 on unit 1,
# outlet 7 on unit 2, outlets 1 through 6
# on unit 3, and outlets 1,2,4 through 6, 7 through 10,
# and 20 on unit 4
newOutletUser Auth-Type = Local, User-Password = "newoutlets"
APC-Service-Type = Outlet,
APC-Outlets = "1[1,2,3];2[7];3[1-6];4[1,2,4-6,7-10,20];"
Network Port Sharing and SNMP Polling
All Rack PDUs in a group can be accessed through the Host Rack PDU via SNMP "rPDU2" OIDs available in our PowerNet MIB.
Note: PowerNet MIB v4.0.6 or higher is required for use with SNMP and a Network Port Sharing enabled device.
The full path to these OIDs is:
iso(1).org(3).dod(6).internet(1).private(4).enterprises(1).apc(318).products(1).hardware(1).rPDU2(26)
Individual Rack PDUs can be identified in the SNMP MIB tables by viewing the corresponding "Module" OIDs in each table. These Module OIDs will return the Display ID of the Rack PDU.
Example Module OIDs: rPDU2IdentModule, rPDU2DeviceConfigModule, rPDU2SensorTempHumidityConfigModule
In order to be backwards compatible with previous versions, the Host Rack PDU will always be the first index in any table that supports multiple Rack PDUs. In addition, after the Rack PDU group is set up, the index order of guest Rack PDUs should not change even if the Display ID is changed or a PDU temporarily loses communication. The index order should only change if you manually remove a Rack PDU from the group. A MIB table walk should skip the indexes associated with a Rack PDU that has temporarily lost communication.
Network Port Sharing and Config.ini
The INI configuration utility is able to get and set values for all Rack PDUs in a group. In order to be backwards compatible, the host Rack PDU will always be designated as first, "PDU_A". Any guest Rack PDUs are then designated "PDU_B", "PDU_C", and "PDU_D" based on their Display ID in ascending order. Therefore, "PDU_A" will not necessarily correlate to Display ID 1, and so on.
Note: Because of the large number of configuration values possible in a Rack PDU group, it may take a very long time to process an INI file set. For example, a Rack PDU group of 4 units with all values changing may take 30 minutes to complete processing.
For a NPS Group, all Rack PDUs in the group should have the same firmware version. If all Rack PDUs in the group have AOS v6.1.3 or later, simply update the host Rack PDU and it will then update all guest Rack PDUs automatically. This may take up to 10 minutes. For any Rack PDUs in the group that do not have AOS v6.1.3 or later, they will need to be updated manually and individually.
 Note: Currently, only the AOS file and rpdu2g application file are supported via the "auto-update" feature in a Network Port Sharing group. Bootmonitor upgrade (along with AOS and rpdu2g APP) is supported in rpdu2g v6.3.3 and higher.
Troubleshooting
You can download appropriate firmware revisions from the APC website.
General information regarding the Network Port Sharing (NPS) Capability of AP8XXX Rack PDU models
Product Line
- Rack Power Distribution
- AP8XXX Rack PDU series only
- v5.1.6 rpdu2g or higher (except where noted)
- All serial numbers
- Users interested in Network Port Sharing (giving the ability to share one IP address via one network connection)
General information
Resolution
Refer to the detailed information sections below.
About the Network Port Sharing Feature
You can use the Network Port Sharing feature to view the status of and configure and manage up to four Rack PDUs using only one network connection. This is made possible by connecting the Rack PDUs via the "In" and "Out" ports on the Rack PDU front panel.
Note: All Rack PDUs in the group must be using the same Rack PDU firmware revision, 5.1.6 or later (excluding v6.0.5 EnergyWise), in order to support the Network Port Sharing Feature. v6.1.0 and higher is also available which supports this functionality while adding the functionality of v6.X.X AOS.
Display ID
The display ID is a number, 1 to 4, used to uniquely identify the Rack PDUs in a group. After two or more Rack PDUs are connected to one another in a group, they can be identified on the various interfaces by the use of this "Display ID". This Display ID is viewable on the LCD by selecting the Display Settings > Display ID > Show option on the LCD keypad.
Installation Instructions
Connect up to four Rack PDUs. Insert an RJ45 terminator (included) in the unused IN/OUT ports on each end of the chain.
- If your AP88XX or AP89XX series Rack PDU was manufactured prior to December 2012, terminators are available from APC. Please contact your local technical support team to obtain these. You'll need two terminators per Network Port Sharing group. Please reference part number 0J-0W05545A which includes qty 2 terminators and provide detail on how many Network Port Sharing groups you plan to have.
- If your AP88XX or AP89XX series Rack PDU was manufactured after December 2012,low profile terminators have been pre-installed for you in either the IN or OUT port already. These can be hard to miss so please verify. Once your group is ready, you can relocate the terminators to the beginning and end of the chain.
- AP84XX and AP86XX series Rack PDUs require terminators to function in standalone installations. They have always included a terminator since release. Originally, AP86XX included a larger terminator, taped to their LCD display. In December, 2012, they were also modified to include a lower profile terminator pre-installed. AP84XX was released in 2014 and all serial numbers will include a pre-installed low profile terminator.
All Rack PDUs in a Network Port Sharing group should reside in the same rack enclosure. Connect the "Network" port of one of the grouped Rack PDUs to a network hub or switch. This unit will be the "Host" for the Rack PDU group. A Host is defined as a Rack PDU that is connected to the network and is part of a Rack PDU group. Set up network functionality for this Host Rack PDU as specified in the Establish Network Settings section. The Host will automatically discover any "Guest" PDUs connected via In/Out ports. The Rack PDU group is now available via the Host's IP address.
Follow the instructions below before powering up any of the Rack PDUs in the group. If it is desired to have a specific assignment of Display IDs, this can be achieved by powering up the units for the first time in the desired order, 1 to 4. For example, before powering up any of the Rack PDUs connected in a group, determine the Display ID order that you would like. Then, first power up the unit that you would like to have Display ID 1. After that unit has initialized and the LCD has started displaying its screens, power on the unit that you would like to have Display ID 2. Continue in the same way for units 3 and 4, if applicable for your setup.
Note: The Display ID can be configured from the the web interface via the "Device Manager > Load Management > device load > Display ID" field.
Network Port Sharing and CLI Commands
The Command Line Interface allows commands to be sent to guest Rack PDUs. The user may specify the Display ID of the Rack PDU to be commanded, followed by a colon, before the first argument (or as the first argument, if the command does not normally have arguments). Providing a Display ID is optional, omitting it will simply command the local Rack PDU.
Syntax: <command> <id>:<arg1> <arg2>
This will send <command> to the Rack PDU with the Display ID <id>. <id> is delimited from <arg1> with a colon character; do not include any spaces between <id>:<arg1>, as spaces are used to delimit arguments.
Example: To view the power for phase 2 on guest Rack PDU 3, type:
apc> phReading 3:2 power
E000: Success
2: 40 W
Network Port Sharing and the Web Interface
Group Control using Network Port Sharing
The web interface of the Rack PDU will have additional capabilities if the Rack PDU is part of a group. These capabilities are only displayed if the Rack PDU is part of a group. This includes a "Group Status" page, and the ability to select which Rack PDU to view data from. The Group Status page lists basic information for the Host Rack PDU and any connected guests. Guests are denoted using a Rack PDU icon and the Display ID. Information on the Group Status page includes name, location, contact, basic model properties, firmware revision information, and group communication status of each Rack PDU. In addition, the Group Status page allows the user to remove any Rack PDUs that have been removed from the group and are in a lost communication state.
v5.1.6 rpdu2g interface (Home->Group Status)
v6.1.0 and higher interface (Status->RPDU->Group)
Most of the web pages under the navigation menus in the web allow you to switch between Rack PDUs for viewing status and configuration/control. This switching is accomplished by selecting the Rack PDU Display ID of the unit you would like to view. This is located at the top right of each table that supports multiple Rack PDUs. The Host Rack PDU that you are logged into is always denoted with an asterisk (*) following the Display ID.
v5.1.6 web interface
v6.1.0 and higher web interface
Note: The Reset/Reboot web page has many additional reset/reboot options for Rack PDU groups. These include individual Rack PDU reset to defaults, individual Rack PDU rebooting, and clearing of guest PDU lost communication alarms by removing the guests from the group.
Network Port Sharing and Outlet Groups/Outlet Users
To create an outlet group, you must enable the desired group method. Choices are Disabled, Local Only, Enabled via Network, and Enabled via In/Out Ports (Network Port Sharing).
All of the Rack PDUs must use firmware that has the same version number for both the APC Operating System (AOS) module and the application module.
Outlet Users
Outlet users can be assigned outlets on any Rack PDU in a group with switched outlets. The outlet users will be stored on the Host PDU. In the web interface, you can view outlets assigned to a particular PDU by clicking on its Display ID in the window. Outlet users can be configured on the Device Manager > Outlet Manager web page.
Network Port Sharing Event/Data Logs and Traps
Rack PDU events from guest PDUs are sent to the host PDU for inclusion into its log. The log entry will include the Display ID of the unit that the event occurred on. These events are then handled the same as local events from the host PDU. Therefore alarms, SNMP traps, e-mails, Syslog, etc will support Rack PDU events and alarms from all Rack PDUs in a group.
Note: System level events will only be logged for the host PDU. System events from guest PDUs will not be logged on the host PDU.
Example event log: Rack PDU 4: Outlet #2 off.
Network Port Sharing and the Data Log
The host Rack PDU will poll data from guest PDUs so that data from all PDUs in a group are available. To view data from a different Rack PDU in a group, select the desired Rack PDU from the "Filter Log" pull-down list. Similarly for data log graphing, you can select a different Rack PDU by clicking on the "Change Data Filter" button.
Network Port Sharing and RADIUS
See the Security Handbook for APC Network Management Cards for more information on using RADIUS.
For RADIUS users file with VSAs, outlets on guest Rack PDUs can be associated to RADIUS users by using the following method.
# give user access to outlets 1, 2, and 3 on unit 1,
# outlet 7 on unit 2, outlets 1 through 6
# on unit 3, and outlets 1,2,4 through 6, 7 through 10,
# and 20 on unit 4
newOutletUser Auth-Type = Local, User-Password = "newoutlets"
APC-Service-Type = Outlet,
APC-Outlets = "1[1,2,3];2[7];3[1-6];4[1,2,4-6,7-10,20];"
Network Port Sharing and SNMP Polling
All Rack PDUs in a group can be accessed through the Host Rack PDU via SNMP "rPDU2" OIDs available in our PowerNet MIB.
Note: PowerNet MIB v4.0.6 or higher is required for use with SNMP and a Network Port Sharing enabled device.
The full path to these OIDs is:
iso(1).org(3).dod(6).internet(1).private(4).enterprises(1).apc(318).products(1).hardware(1).rPDU2(26)
Individual Rack PDUs can be identified in the SNMP MIB tables by viewing the corresponding "Module" OIDs in each table. These Module OIDs will return the Display ID of the Rack PDU.
Example Module OIDs: rPDU2IdentModule, rPDU2DeviceConfigModule, rPDU2SensorTempHumidityConfigModule
In order to be backwards compatible with previous versions, the Host Rack PDU will always be the first index in any table that supports multiple Rack PDUs. In addition, after the Rack PDU group is set up, the index order of guest Rack PDUs should not change even if the Display ID is changed or a PDU temporarily loses communication. The index order should only change if you manually remove a Rack PDU from the group. A MIB table walk should skip the indexes associated with a Rack PDU that has temporarily lost communication.
Network Port Sharing and Config.ini
The INI configuration utility is able to get and set values for all Rack PDUs in a group. In order to be backwards compatible, the host Rack PDU will always be designated as first, "PDU_A". Any guest Rack PDUs are then designated "PDU_B", "PDU_C", and "PDU_D" based on their Display ID in ascending order. Therefore, "PDU_A" will not necessarily correlate to Display ID 1, and so on.
Note: Because of the large number of configuration values possible in a Rack PDU group, it may take a very long time to process an INI file set. For example, a Rack PDU group of 4 units with all values changing may take 30 minutes to complete processing.
Updating firmware for Network Port Sharing Groups
For a NPS Group, all Rack PDUs in the group should have the same firmware version. If all Rack PDUs in the group have AOS v6.1.3 or later, simply update the host Rack PDU and it will then update all guest Rack PDUs automatically. This may take up to 10 minutes. For any Rack PDUs in the group that do not have AOS v6.1.3 or later, they will need to be updated manually and individually.Troubleshooting
- If you are having communications problems with Network Port Sharing, check that the total length of network cable between up to four units is not more than 10 meters.
- If you are having communications problems with Network Port Sharing, check that a terminator (part number 0W04161A or the lower profile version 0W05545A) is installed at both ends of up to four units that can be grouped together.
- If you are using Network Port Sharing and do not see one or more of the units in the group, check that all units in the group are using the same firmware revision.
You can download appropriate firmware revisions from the APC website.
Released for:APC Canada


