Issue:
User wants to update the JRE PowerChute Network Shutdown uses and the Java update drop-down menu is not displayed in the UI.
Product:
PowerChute Network Shutdown version 4.3, 4.4
Environment:
All supported OS
Cause:
Incompatible JRE or incorrect install folder
Solution:
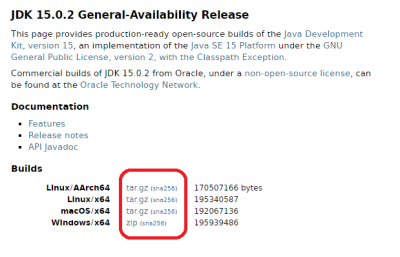
1. Download a valid JRE on to your system. JREs can be downloaded from the OpenJDK website.
PowerChute v4.3 supports Java 11 or above.
PowerChute v4.4 supports JRE 14 or above.
NOTE: When downloading the Java file the file will be compressed. Do not un-compress the file. The required file will be .zip or .gz depending on the OS

2. Navigate to the PowerChute installation directory, and create a new folder named Uploads. If the default installation directory was chosen during installation, this location will be:
Windows Example:

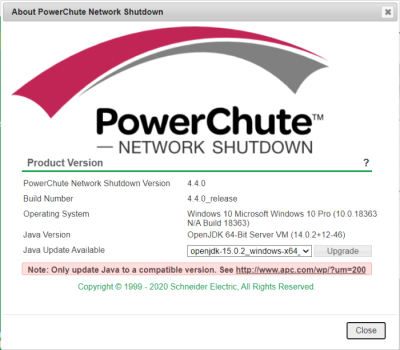
4. Open the PowerChute web UI and navigate to About - Help. You will see a Java Update Available drop-down menu.

5. Select the Java version you want to update PowerChute to use from the drop-down, and click Upgrade.
6. A confirmation dialog will appear. Click OK.
7. Another dialog will appear and PowerChute will restart. Wait two - three minutes for the Java version to successfully update.
8. When the PowerChute service restarts, refresh your browser and navigate to the About screen. The Java Version field will be updated to show the new Java version used by PowerChute.
NOTE: It is not necessary to keep the downloaded Java files in the Updates directory after the Java update has completed.
User wants to update the JRE PowerChute Network Shutdown uses and the Java update drop-down menu is not displayed in the UI.
Product:
PowerChute Network Shutdown version 4.3, 4.4
Environment:
All supported OS
Cause:
Incompatible JRE or incorrect install folder
Solution:
1. Download a valid JRE on to your system. JREs can be downloaded from the OpenJDK website.
PowerChute v4.3 supports Java 11 or above.
PowerChute v4.4 supports JRE 14 or above.
NOTE: When downloading the Java file the file will be compressed. Do not un-compress the file. The required file will be .zip or .gz depending on the OS
2. Navigate to the PowerChute installation directory, and create a new folder named Uploads. If the default installation directory was chosen during installation, this location will be:
- C:\Program Files\APC\PowerChute\Updates for Windows systems
- /opt/APC/PowerChute/Updates for Linux systems
Windows Example:
4. Open the PowerChute web UI and navigate to About - Help. You will see a Java Update Available drop-down menu.
5. Select the Java version you want to update PowerChute to use from the drop-down, and click Upgrade.
6. A confirmation dialog will appear. Click OK.
7. Another dialog will appear and PowerChute will restart. Wait two - three minutes for the Java version to successfully update.
8. When the PowerChute service restarts, refresh your browser and navigate to the About screen. The Java Version field will be updated to show the new Java version used by PowerChute.
NOTE: It is not necessary to keep the downloaded Java files in the Updates directory after the Java update has completed.

